Friday, July 10, 2020

10 YouTube URL Tricks You Should Know About

Though YouTube remain the premier site, you probably don’t think much about customizing it. But whether you’re a casual user or watch online videos every day, there are all sorts of ways to tweak YouTube.

A major category of these are special YouTube URLs. Let’s look at some YouTube URL tricks to help you get more out of the service, like turning videos into GIFs.

1. Link to Any Part of a Video
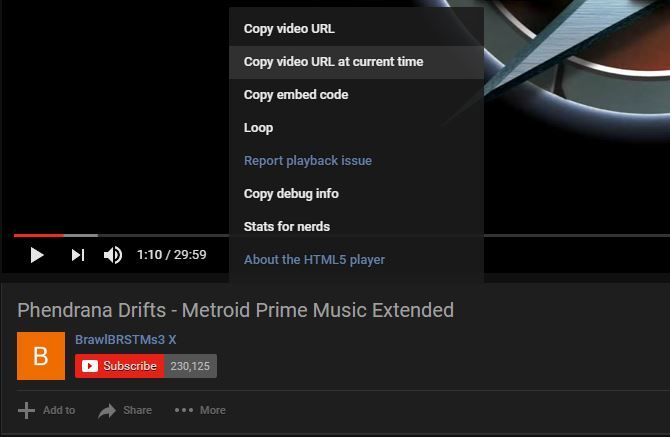
YouTube Copy URL Current Time
Typically, when you copy a link to a YouTube video, it starts from the beginning. If you want to show someone just a bit of a video or skip a lengthy intro, you can append a time stamp to the URL to start it at that time.
You can do this in a couple of ways. By manually adding &t=YmXXs to the end of a video URL, you’ll set it to start minutes and XX seconds into the video. You can omit minutes, or use only seconds, such as 90s for a minute and a half. So this video:
youtube.com/watch?v=7RWI3-8N_-Y
Can be shared 90 seconds in using this URL:
youtube.com/watch?v=7RWI3-8N_-Y&t=1m30s
If you don’t want to use the manual method, pause the video at the time you’d like to share it at, then right-click and choose Copy video URL at current time. And there are plenty more YouTube sharing tricks worth knowing.
So change this URL:
youtube.com/watch?v=oeb5LdAyLC8
To this to loop it:
youtuberepeater.com/watch?v=oeb5LdAyLC8
You can tweak the playback using the options below the video if you want to start or end at different points. To do this without changing the URL, just right-click any YouTube video and toggle Loop on.

3. Bypass Age Restrictions

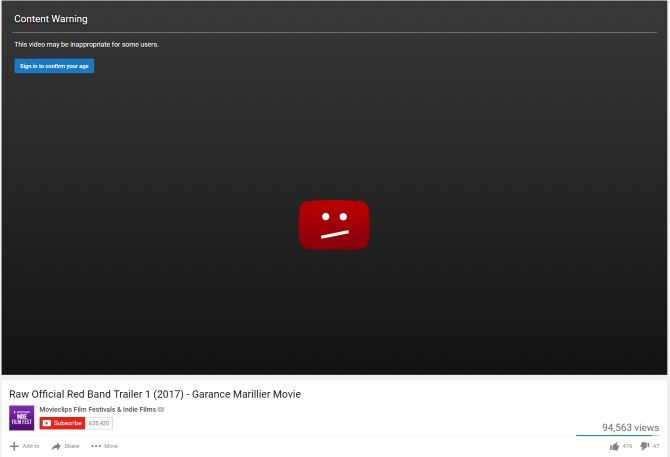
YouTube Age Warning
YouTube has age restrictions on certain videos that are flagged as containing mature content. Whether you don’t have a YouTube account or don’t feel like signing in to watch one, you can perform a little trick to bypass the sign-in.
Take a YouTube URL for a restricted video like this:
youtube.com/watch?v=wvZ6nB3cl1w
Simply append gen in front of youtube as shown here:
genyoutube.com/watch?v=wvZ6nB3cl1w
The video will open on a new page that features no age restriction.

4. Skip a Certain Amount of the Intro

Similar to the trick that lets you pick the start time, you can also choose to skip a certain number of seconds at the start of the video. You can’t specify minutes with this one, so use 90 (seconds) for a minute and a half.
So, to skip the first 30 seconds of this video:
youtube.com/watch?v=uA0nSkSxA3E
Add &start=30 to the end of the URL and get this:
youtube.com/watch?v=uA0nSkSxA3E&start=30
This is similar to the timing one but is a bit faster to type and doesn’t require you to remember a certain time stamp.

5. Claim a Custom YouTube Channel URL
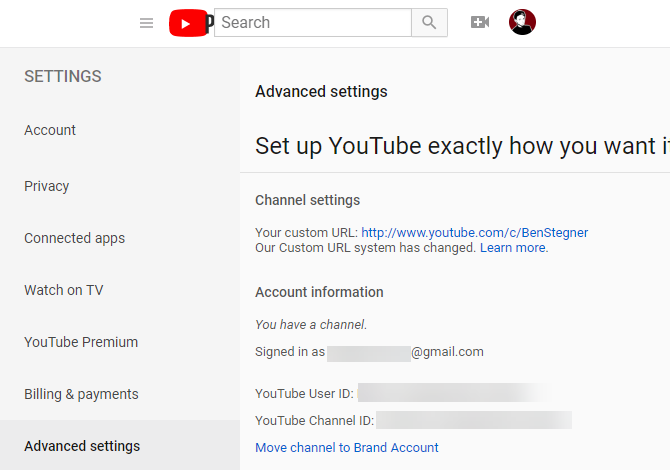
YouTube Custom Channel URL
If you have your own YouTube channel and meet certain requirements, you can set a vanity URL for your page. This is much easier to remember than the default random string of characters, so it’s worth doing for easier linking.
To get a custom URL, your channel needs to meet the following criteria:
  • Have at least 100 subscribers
  • Be at least 30 days old
  • Have an uploaded profile photo and channel art
If you satisfy these, head to YouTube’s Advanced settings page by clicking the gear in the top-right, choosing Settings, and clicking Advanced settings on the left. Here under Channel settings, you’ll see the text You’re eligible for a custom URL if that’s the case. Click the link next to this and proceed through the steps to create a custom URL and confirm the terms of use.
Once your custom URL is set up, anyone can head to youtube.com/[YourCustomURL] to visit your channel. Note that you can only have one custom URL at a time. You can’t change it, but you’re allowed to remove your current URL and create a new one, if it’s available.

6. Check Out YouTube TV
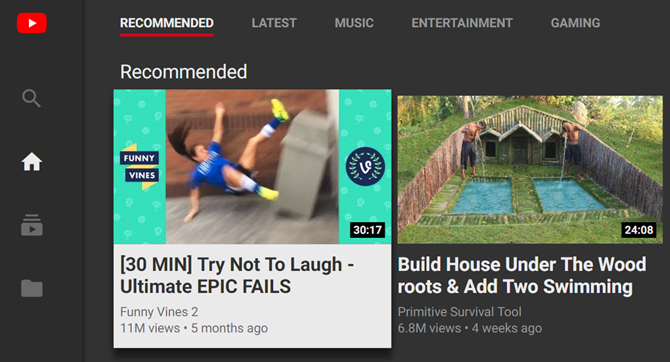
YouTube TV Interface
YouTube TV is an interface designed for smart TVs and apps on consoles. It’s still YouTube, but with less clutter and a few shortcuts that are easier for remotes. You probably won’t want to make this your main YouTube interface, but it’s worth checking out for a cleaner look.
Just visit this URL to try it:
youtube.com/tv

7. Jump Straight to Your Subscriptions

As hard as it tries, many times the suggestions offered by YouTube aren’t useful. Whether your recommendations are filled with strange content or the home page contains videos you don’t care about, you can set a better YouTube landing page.
When you’re signed in, try changing your YouTube bookmark from the main site to your subscriptions page using this URL:
youtube.com/feed/subscriptions  
This lets you see the newest videos from channels you subscribe to, so you don’t miss any of their new content. Thus, you’re in control of what you see instead of YouTube deciding for you.

8. Grab the Thumbnail of Any Video

It’s common when searching Google for images to see pictures from YouTube videos, usually titled maxresdefault.
You can actually view a high-quality thumbnail for any YouTube video (if it has one) by visiting the following URL:
img.youtube.com/vi/[VideoID]/maxresdefault.jpg  
Replace the [VideoID] with the text after the v= at the end of a YouTube video. So to view the thumbnail for this video:
youtube.com/watch?v=YMbm_SFJugQ
Visit this link:
img.youtube.com/vi/YMbm_SFJugQ/maxresdefault.jpg

9. Make a GIF from a Video
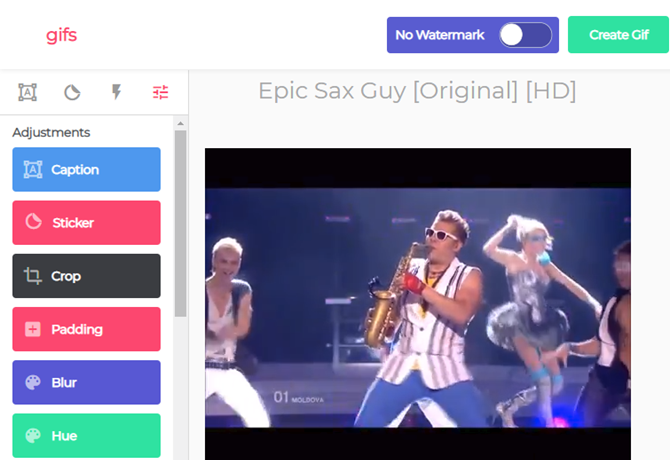
YouTube Create GIF
Found a YouTube video that has a GIF-worthy moment? You can easily create an animated GIF from any part of a video by adding gif before the YouTube link.
So to edit this video into a GIF:
youtube.com/watch?v=gy1B3agGNxw
Change the URL to this:
gifyoutube.com/watch?v=gy1B3agGNxw
You’ll be brought to gifs.com, where you can add a variety of effects and crop the GIF to your liking. Once done, share the GIF to social networks with an easy link or download it for safekeeping.
Note that exceptionally long videos won’t work with this service.

10. Mash Up YouTube Videos

This one isn’t a true URL hack, as you can’t visit it right from YouTube. However, it still uses YouTube URLs, so we’re including it. Visit YouTubeDoubler and you can add two YouTube URLs to mix together. You can choose to start either video at a certain time to help them sync up.
Whether you see how two songs sound when played at the same time or want to add some funny background music to a clip, have a look and see what you can create!

Start Having Fun with YouTube

These tricks will let you get even more out of YouTube. Some are built into YouTube itself, while others rely on outside services. It’s possible that any of these could stop working in the future, so your mileage may vary as time passes.

How to Mirror Your Android Screen to a PC or Mac Without Root

Sometimes, you might want to see your Android phone’s screen on your PC. How do you do that?


If you have rooted your Android device, it’s easy. But if you haven’t rooted, there are still some simple ways to get your phone or tablet’s screen to show on your PC or Mac.

Why Mirror Android to Your PC?

Why would you mirror your screen? There are plenty of reasons. You might be a developer in the middle of coding and want to check your app without having to constantly reach for your phone. You might want to share your pictures on a big screen without uploading them. Or you might need to give a presentation quickly while the projector is connected to a PC.
The quickest and easiest way, as you will find out, requires no installation on your phone, and a simple app for your computer.

What You’ll Need

Vysor, made by prolific Android developer Koushik Dutta, is the simplest way to get your Android screen onto your PC or Mac’s screen.
Here’s what you need to get started:


  1. Download Vysor for Windows | macOS | Linux | Google Chrome (Free)
  2. A USB cable to connect your phone to your PC.
  3. An Android smartphone or tablet with USB debugging enabled.
  4. Enable USB debugging mode on your android
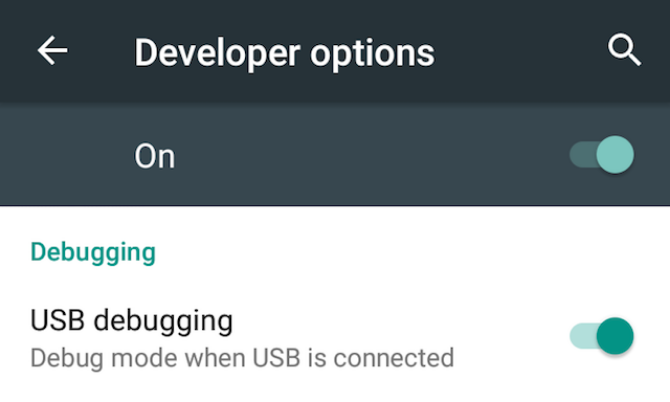
enable usb debugging on android
We have a full explanation of what USB debugging mode is, but you don’t need to concern yourself with that here. All you need to know is how to enable it:
  1. Go to Settings > About phone (Settings > System > About phone on Android 8 Oreo and newer).
  2. Scroll down and tap Build Number seven times.
  3. Go back to Settings (Settings > System on Oreo and later) and enter the new Developer Options menu.
  4. Scroll down and enable USB debugging.
  5. Confirm the action when prompted.

Share Your Screen to Your PC or Mac via USB

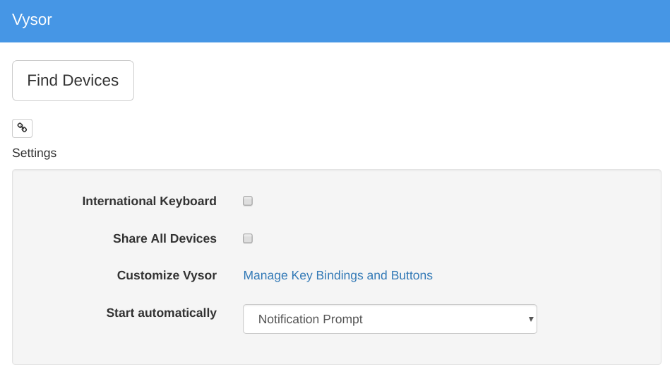
Mirror android phone screen to PC with vysor
Advertisement
Now that you have USB debugging mode activated, the rest is simple.
  1. Start Vysor by searching for it on your computer (or via the Chrome App Launcher if you installed there).
  2. Click Find Devices and select your phone.
  3. Vysor will start up, and you’ll see your Android screen on your computer.
  4. Optional: You can set your phone to connect automatically every time you plug in the USB cable.
With this, you are ready to go. Your mouse and keyboard work within Vysor, so you can start any app you want and type in it too.
There are plenty of apps that don’t have a web client, so this is a good way of using your physical keyboard for your phone’s apps.

Four Reasons for Vysor’s Appeal

  1. You don’t need anything installed on your Android phone.
  2. It works on Windows, Mac, and Linux.
  3. The USB cable makes your screen reflect in almost real-time, as opposed to wireless solutions where there is distinct lag.
  4. You can interact with your phone’s screen through your computer.
Try it out and see how you like it. If it’s useful to you, you can pay ($2.50/month or $10/year) for Vysor Pro, which enables high-quality mirroring, wireless mirroring, and drag-and-drop file sharing.
How Share Your Android Screen Wirelessly
If your phone runs on Android 5 Lollipop or later, Google has made it easier to mirror the screen of any device. For a wireless, cross-platform solution, Koushik Dutta has another app.
How to set up Android Mirroring with AllCast:
  1. Download: AllCast Receiver for Chrome (Free)
  2. Download: Screen Recording and Mirror for Android (Free)
  3. Make sure your computer and smartphone are on the same Wi-Fi network.
  4. Start AllCast Receiver through the Chrome App Launcher.
  5. Start Screen Recording and Mirror on your Android phone.
  6. In Screen Recording and Mirror, choose the Network Device that matches your PC. It will still start with Chrome @ followed by an IP address.
Just like that, your screen will be wirelessly mirrored on your computer. This is the easiest way to share your Android screen without the hassle of a cable, and it supports other devices on the same network too, including Fire TV, Apple TV, Roku, and more.
This method has a few disadvantages:
Advertisement
  1. You cannot interact with your screen through your PC. The interaction is limited to your phone itself, but you will see what’s happening on the big screen. Unfortunately, that means no typing with your computer’s keyboard on your phone.
  2. Unfortunately, there’s no way to remove annoying Mirror floating watermark. This can be a dampener for presentations and slideshows.

Rooted Is Still the Best Option

As Android has grown, it’s added so many features that only power users really need to root. But if screen mirroring is important to you, then I would still recommend you root because it gives you access to the best way to mirror Android to a PC.
The Android management client Airdroid offers a built-in protocol to wirelessly mirror a rooted Android phone to a Windows or macOS computer. It works for non-rooted phones too, but this requires a cable and works much like the aforementioned Vysor.
But with a rooted phone, you only need to be on the same Wi-Fi network to start mirroring immediately, without watermarks. And you can control the phone too, unlike the AllCast option above.

The Quickest Way to Install Windows Software: The Command Prompt

Installing apps on Windows is a time-consuming process. The user has to go through a series of steps to patch the software—search for the recent version of an app, download the installer file, manually install the app (next, next several times), and uncheck unwanted bundleware or ads.

Solution: Chocolatey (Package Manager)
A package manager is a collection of tools to automate the entire process of installing, configuring, and updating apps. The package consists of software binaries, configuration files, and metadata. The metadata, in turn, has all the details of an app (name, description, version number, and more) and the list of dependencies to make it work properly.
Although there are many package managers for Windows, none of them has the simplicity and security of Chocolatey. With few bits of code, you can deploy the app in every system and also track or manage updates of that software over time.
Here are some reasons why we prefer Chocolatey:
  • It has the largest online database of Windows packages. As of now, there are 11,166 community-maintained packages. You can even install packages from NuGet and MyGet.
  • Package submissions go through a rigorous moderation review process, including package validation, verification, virus scanning with VirusTotal, and more. For an organization, the use of the community package repository is optional.
  • Chocolatey works with over 20+ installer technologies for Windows. It knows how to set up an app, registry, manage files and configuration, or any combination.
  • Chocolatey can even work with installed apps. It can take over existing application files in the Programs directory and also handle uninstalls. However, it depends on the packaging and software installer used.

Installing Chocolatey in Windows 10

Chocolatey installation is quick and intuitive. You don’t need a thorough knowledge of the Command Prompt or PowerShell. However, you must fulfill the basic system requirements and have the patience to install a few scripts. 
SystemRequirements
  • Windows 7+/Windows Server 2003+ and above
  • PowerShell v2+ and above
  • .NET framework 4+ (the installation will try to install .NET 4.0 if you don’t have it installed)
  • Free space for Chocolatey CLI and another 1GB+ or more for installing packages

PowerShell Method

Press Win + X and select Windows PowerShell (Admin). At first, you must ensure Get-ExecutionPolicy is not restricted.
Type in Get-ExecutionPolicy, if it returns Restricted then that means you cannot install any script. To bypass it, type in Set-ExecutionPolicy AllSigned and “Y” to confirm the change.
bypass execution policy in PowerShell
Copy-and-paste the command
Advertisement
Set-ExecutionPolicy Bypass -Scope Process -Force; iex 
((New-Object 
System.Net.WebClient).DownloadString('https://chocolatey.org/install.ps1'))
Press Enter.
install chocolatey through PowerShell
Within a few moments, Chocolatey will get installed and create a new folder in Program Data. All the packages go to \chocolatey\lib (though there may be an exceptions for .MSI installers).
You can also set up a custom installation path for packages like Python, Ruby, or Node.
Advertisement
chocolatey installation folder
Once Chocolatey gets installed, restart the PowerShell and type in choco /? to see the list of commands.
invoke choco help to get the list of commands

Command Prompt Method

If you use the command prompt, press Win + X and choose Command Prompt (Admin). Then, copy-and-paste the command
Advertisement
@"%SystemRoot%\System32\WindowsPowerShell\v1.0\powershell.exe"
-NoProfile -InputFormat None -ExecutionPolicy Bypass -Command "iex
((New-Object
System.Net.WebClient).DownloadString('https://chocolatey.org/install.ps1'))"
&& SET "PATH=%PATH%;%ALLUSERSPROFILE%\chocolatey\bin"
Press Enter.
install chocolatey through command prompt
Chocolatey will get installed on your system in a few seconds. Restart the prompt and type in choco /? to see the list of commands.

Chocolatey Packages

Chocolatey packages are modified .nupkg files. It is a compiled zip file carrying the package metadata (including version information, dependencies, and distribution rights). If you delete the metadata specific to chocolatey, the package file is similar to NuGet.
The interesting part of Chocolatey is the community repository of packages known as the community package repository. Every package submitted to the database undergoes a rigorous moderation process before it goes live.
On the left side, you’ll see the links to the package maintainer, validation check button in colors green, red, and yellow, and instructions to install the app. Under the Install section, you’ll see the command instructions to install Google Chrome.
chocolatey package in detail
In the same section, there are instructions to upgrade and uninstall the app. The Version History menu lists all the versions, including their changelog. And there is a section on Virus Scan Results, in case you’re not confident of installing a particular app.
details of a particular package

How to Install Software Using Command Prompt or PowerShell

You probably have a list of frequently used apps you install on Windows. Instead of having to visit a website and using an installer, launch PowerShell and type in the syntax
choco install [app name]
“choco” is the short name of Chocolatey. Whenever you install, upgrade, or uninstall any app, you must prefix it with “choco.” The second prefix is the actual command. Since we’re installing the app, we’ll use the prefix “install.” The third prefix is the software name.
Navigate to the chocolatey package site and search for the app. Notice the command line instruction to install that app.
installing app through chocolatey
For example, to install Gimp, type in
choco install gimp
This will download and install the app to your system, without requiring any action on your part. You’ll see the progress information in the console itself. In a few cases, your app might show windows, but that’s perfectly normal.
Chocolatey will take care of all the installation steps automatically. Once your app gets installed, you’ll find it in the Start menu.
installing gimp through chocolatey

Search Your Package

You can even search for a particular package with syntax
choco search [app name]
For example, if you wish to install 7-zip, type in
choco search 7-zip
When you press Enter, chocolatey will search for every app with the word “zip” in its database. If it’s there, you’ll find it in the results. Searching for a particular app requires a bit of practice. Use the repository package website whenever you need any help.
use the chocolatey search for a particular package

Upgrading a Package

To upgrade an app, type in
choco upgrade [app name]

List of Outdated Packages

It’s also possible to see the list of all outdated apps. To make this work, you must install apps through Chocolatey. Type in
choco outdated

outdated chocolatey packages

Uninstall a Package

If you don’t find an app useful, you can uninstall it through Chocolatey. Type in
choco uninstall [app name]
In most cases, the commands mentioned above are all you will ever need. But chocolatey has many more functions. Visit the command references page for more details.

Install Your Next App With the Command Prompt

Many people still find it a hassle to update their apps. Chocolatey lets you install a dozen or more apps with just a few keystrokes. You can easily manage your apps without any security concerns or bundleware.
Modern OS’es provide you automated installer packages and commands that install many bits of software at once. But have you ever thought what is happening behind the scene when you run that installer? 

Monday, July 6, 2020

Plex Launches a Free Streaming Service

Plex has launched its own free streaming service full of movies, TV shows, and documentaries. Plex is offering thousands of pieces of content for free, and you may have even heard of some of them. And all you need to do is sit through the occasional ad

Plexannounced its streaming service in a post on The Plex Blog. The company is offering “thousands of free movies, TV shows, extreme sports films, music documentaries, Bollywood musicals, and more.” It’s free, with no hardware or subscription required.
Plex claims that it’s aiming to “deliver the best experience possible, while also giving you the control and customization to stream it your way.” And unlike other free streaming services, Plex’s offering is available in more than 200 countries worldwide.
As for the content, while there’s bound to be a lot of stuff you’ve never heard of, there are also some big-name films included. Such as Rain Man, American Ultra, Apocalypse Now, Raging Bull, The Terminator, Teen Wolf, Thelma and Louise, and Lord of War.

How to Watch Free Movies and TV Shows on Plex

All you need to do is head to Plex.tv/watch-free/ and sign up for a free Plex account. After that you’ll be able to watch lots of content for free across a range of different devices. There will be the occasional ad break, but that’s surely a small price to (not) pay.

Thursday, July 2, 2020

What Is USB Debugging Mode on Android? Here’s How to Enable It

Android is easy to use out of the box, but it packs lots of hidden features for power users. Many of these are hidden in the Developer Options menu. As the name implies, these features are vital for developers building Android apps, but they aren’t as important for the average user.

One of the most well-known Android developer features is USB Debugging. You may have seen this term floating around and wondered whether you should enable it. Let’s take a look at what Android USB Debugging mode is for and whether you need it.

What Is USB Debugging Mode?

USB Debugging allows an Android device to communicate with a computer running the Android SDK to use advanced operations.
When you develop Android apps, you have to install the Android Software Developer Kit (SDK) on your computer. An SDK gives developers the tools they need to create apps for a certain platform.Usually, you install it alongside Android Studio, which is a development environment for Android apps. It includes a suite of tools that’s vital for any developer, such as a debugger for fixing problems and a visual editor.
Libraries are another key component of the SDK. These allow developers to perform common functions without having to re-code them. For example, Android has a built-in printing function, so when writing an app, you don’t have to come up with a new way to print. You simply call the built-in method included in the library when it’s time to do so.

You can do a lot with Android from the device itself. But developers need more options. It would be a huge pain to move files between devices, run commands, and take other actions manually, so they use tools built into Android Studio and the Android SDK to make them painless.
If you don’t need Android Studio, you can install just the Android SDK. You’ll need to do this if you want to root your phone or perform other advanced tasks.
Enabling USB Debugging allows your phone to communicate with a PC so you can take advantage of these tools.

How Do I Enable USB Debugging on Android?

On modern Android devices, you’ll find USB Debugging in the Developer Options menu, which is hidden by default.
Advertisement
To unlock it, head to Settings and scroll down to About phone. Scroll down again, and you’ll see a Build number entry at the bottom. Tap this several times, and you’ll see a notification letting you know that you’re now a developer.
Regardless, once you’re inside, look for USB debugging under the Debugging header. Hit the slider to enable it, and confirm Android’s warning that you understand what this feature is for.

Now you’ve turned on USB Debugging. To use it, you just need to plug your phone into a PC using a USB cable. When you do this, you’ll see a prompt on your phone asking if you want to authorize USB Debugging for that specific computer. This is a security feature designed to keep your device safe from attack, so make sure you trust the computer before accepting this.
If you ever accept a prompt for a device by mistake, select Revoke USB debugging authorizations to reset all trusted computers.

What Does Android USB Debugging Do?

Without USB Debugging, you can’t send any advanced commands to your phone via a USB cable. Thus, developers need to enable USB debugging so they can push apps to their devices to test and interact with.

Advertisement
When you create a new build of your app in Android Studio and want to test it, you can push it to your connected device with just a few clicks. After building, it will run and pop up on your device right away. This is way faster than manually sideloading APK files.

This why Android displays a confirmation prompt, so you don’t connect to a PC you don’t trust. However, an unsuspecting user could accept the prompt without realizing what it’s for.
Additionally, leaving USB Debugging enabled makes your device open to attack if you were to lose it. Someone who knew what they were doing could connect your device to their computer and issue commands to it via ADB without knowing your PIN. That’s scary, and a good reason you should have Android Device Manager set up so you can remotely locate or erase your device. you regularly use ADB and connect your Android device to your PC, you shouldn’t leave USB Debugging enabled all the time. It’s fine to leave on for a few days while you’re working on something, but there’s no need to have it enabled when you’re not regularly using it.

How Do You Use Android USB Debugging?

We’ve taken a tour of what USB Debugging does and what you can use it for. In summary, this feature allows you to push advanced commands to your device when you connect your phone to a PC. USB Debugging is vital for developers but still holds some useful tricks for power users. While you should feel free to enable it when needed, we recommend keeping it turned off when you’re not using it. This will increase the security of your device.
If you’re looking for more useful USB-related info for your Android phone, be sure look at cool ways to use USB OTG on your Android phone.

Wednesday, July 1, 2020

Is banning 59 Chinese apps enough to protect your privacy and data?


Is banning 59 Chinese apps enough to protect your privacy and data?
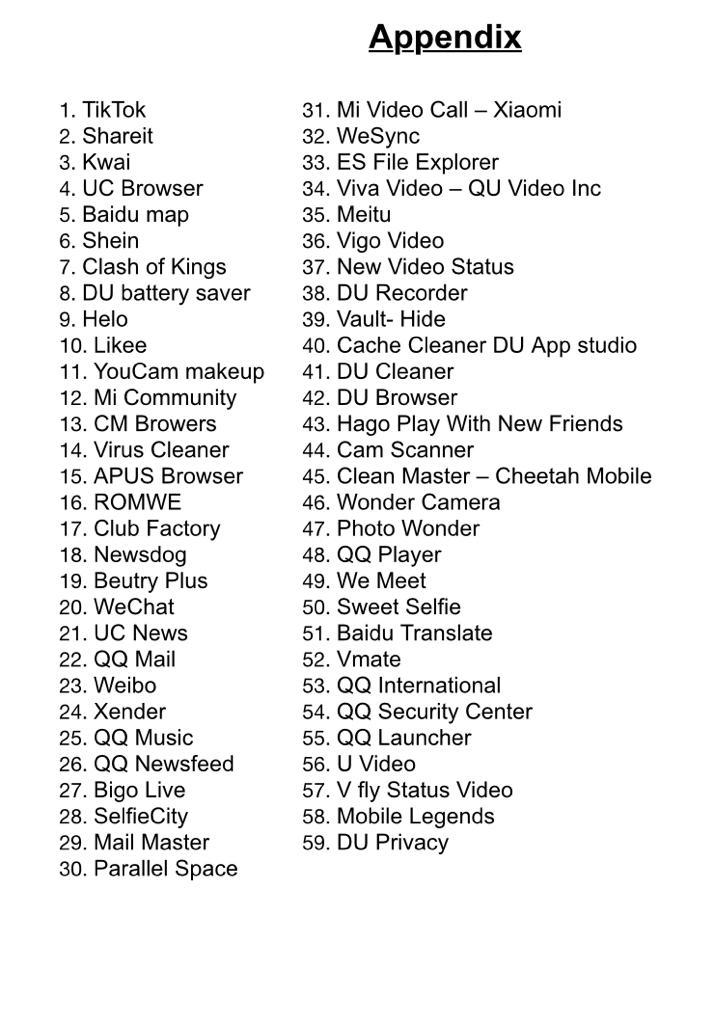
The Government of India banned 59 Chinese apps that include some of the most popular TikTok, UC Browser, Shareit, Cam Scanner, etc.
59 Banned Chines Apps
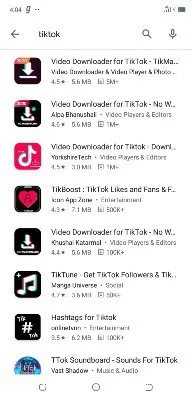
Now if you check Google Play Store or Apple’s App Store, these apps have disappeared. Users can note download these apps from Google Play Store and Apple App Store as well as not from its website.
TikTok Ban

What was the reason for banning 59 apps?

In a press statement on Monday night, the Ministry of Information Technology had mentioned that they have received many complaints from various sources about the misuse of some mobile apps for stealing and surreptitiously transmitting user data to other servers located outside India in an unauthorised manner.
“The compilation of these data, its mining and profiling by elements hostile to national security and defence of India, which ultimately impinges upon the sovereignty and integrity of India, is a matter of very deep and immediate concern which requires emergency measures,” the statement said.

Is it enough?

So, no more malicious Chinese apps, meaning now we are very sure that no one is stealing our data! Well, if you are using a Chinese phone with a customised layer (UI- User interface) – MIUI – Xiaomi and ColorOS – Oppo, etc. no one can guarantee that you are not being tracked.
Since 2015, there have been several reports about Chinese smartphones sending data to servers back in China. GData also reported that smartphones from Xiaomi, Lenovo and Huawei had pre-installed malware in them.
The OS can easily collect your mobile data including the phone’s serial number, IMEI, phone number, the mobile networks it uses, and which apps were being opened and how long they were used. Almost everything.
That means, it’s not enough, your smartphone is still venerable.

Why they collect data?

When you buy a new phone and register to use it, you agree to terms, in a way, surrendering your privacy to the smartphone maker. This agreement is required for a smartphone to function properly and be compatible with the way you use it. Certain applications need access to your contacts, location and messages.
They collect usage analytics through the user experience program, then use the same to better understand general phone behaviour and optimise the OS. So, they collect your data to improve your experience with the device.

Conclusion

If you are really worried about your data and privacy, removing these apps will help up to a certain extend. Try to restrict access of all app, install only essential apps which you use on a daily basis.
Do not download from unknown sources. Most importantly, if you are using a Chinese phone, do not agree to join any user experience program. Check your privacy, what data is being collected and you can restrict some of the access if not all.

Google Removes 25 Android Apps Caught Stealing Facebook Credentials

Google has removed this month 25 Android apps from the Google Play Store that were caught stealing Facebook credentials. From a report: Before being taken down, the 25 apps were collectively downloaded more than 2.34 million times. The malicious apps were developed by the same threat group and despite offering different features, under the hood, all the apps worked the same. According to a report from French cyber-security firm Evina shared with ZDNet today, the apps posed as step counters, image editors, video editors, wallpaper apps, flashlight applications, file managers, and mobile games. The apps offered a legitimate functionality, but they also contained malicious code. Evina researchers say the apps contained code that detected what app a user recently opened and had in the phone's foreground. If the app was Facebook, the malicious app would overlay a web browser window on top of the official Facebook app and load a fake Facebook login page (see image below: blue bar = actual Facebook app, black bar = phishing page)

Ways to Check Who Is Tracking You Online

  How much do you love online content? So much you pay for everything you can? Or do you, like the overwhelming majority of internet users, ...